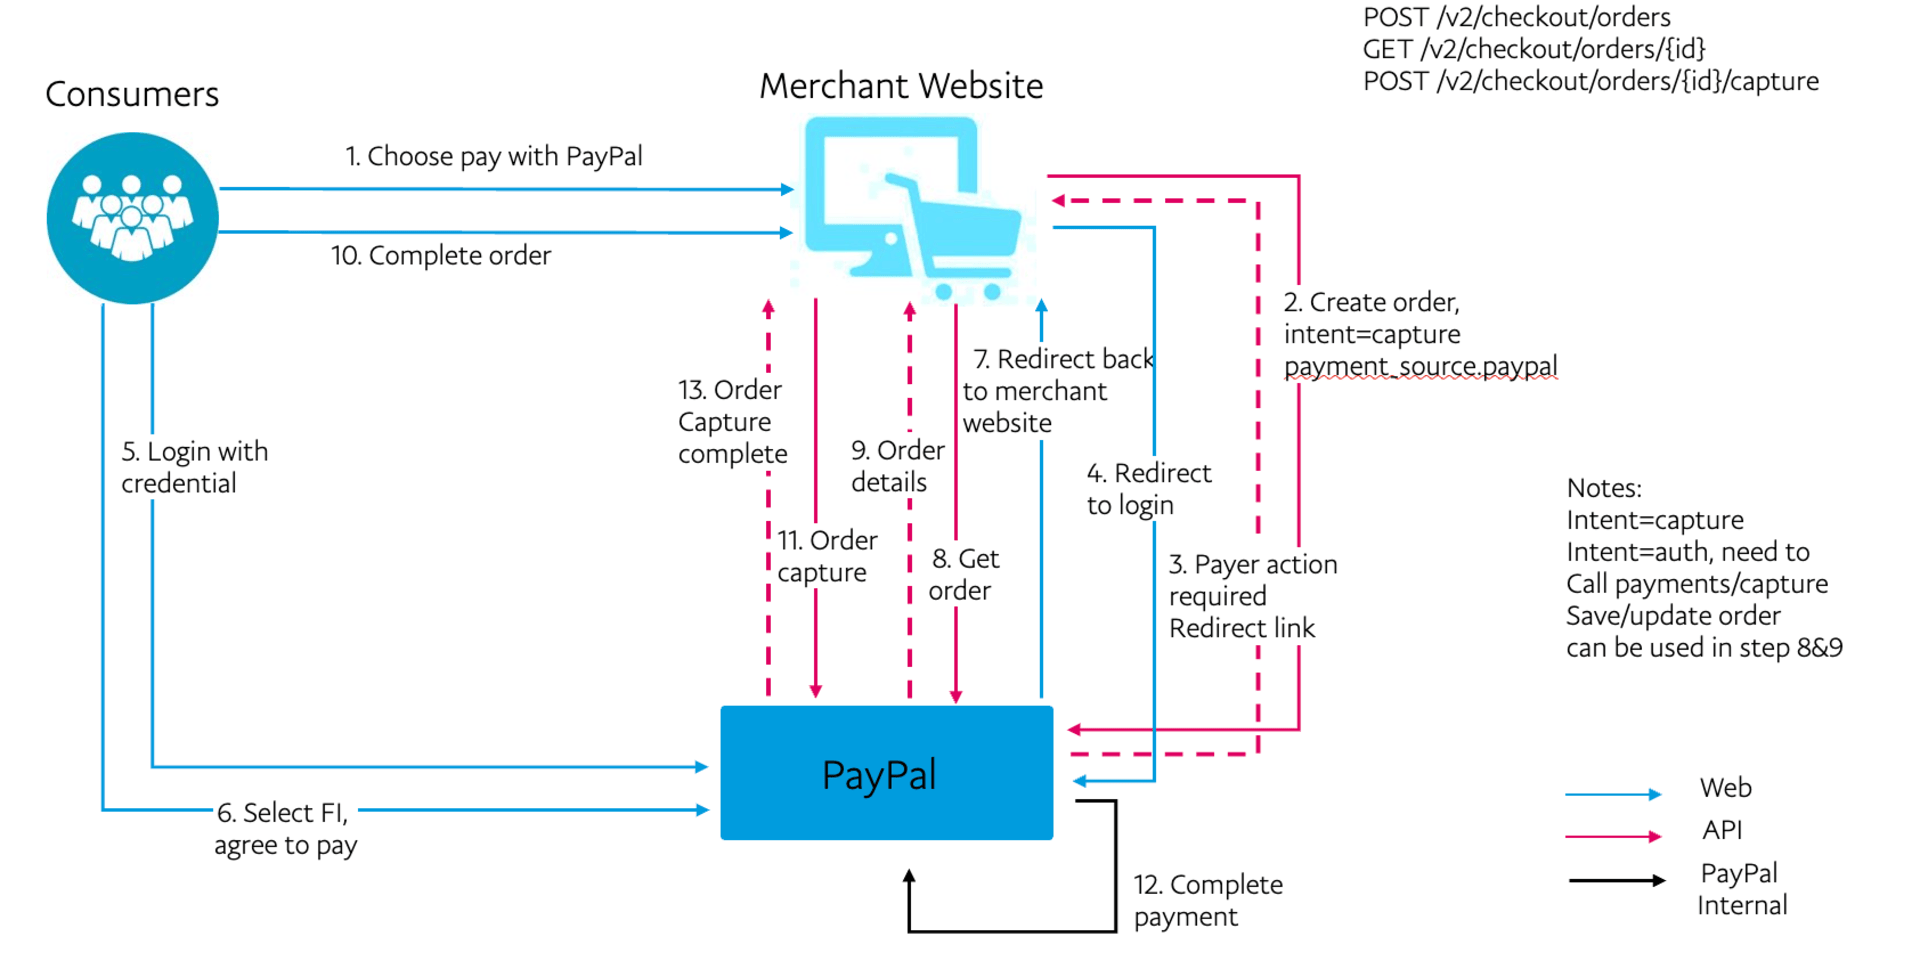
PayPal Checkout flow
A buyer following the PayPal Checkout flow has a PayPal account and uses payment methods like PayPal, Venmo, debit, and credit cards to pay for their order:- Buyers are aware that PayPal is processing their payments.
- Buyers can pay for the order using any of the PayPal-associated payment methods.
- Payment sources for these orders can be PayPal, Venmo, PayPal Pay Later, debit card, or credit card.

Orders API flows using PayPal Checkout for Pay with PayPal
This section uses PayPal as the payment source to showcase the possible Orders v2 API flows in a PayPal Checkout integration.Note: All of the Orders v2 API endpoints are designed for merchants and partners. The payer only comes into picture during the approval or payer action required steps.You need to pass an
intent during the order creation. You can select either CAPTURE or AUTHORIZE:
CAPTURE: Use this intent to capture a payment immediately after the buyer approves the purchase.AUTHORIZE: Use this option to authorize a buyer’s funds before you capture payment and settle the purchase later. An authorization places a hold on the money and is valid for 29 days.
Orders v2 API, detailed PayPal Checkout flow

Multi-step order flow with PayPal Checkout
There are 3 different ways to complete a PayPal Checkout payment:PayPal Checkout with the payment source in a create order request
- Create the order: pass the
payment_sourcein the payload. - Payer action required: send the payer to the Review your purchase page.
- Capture or authorize payment.
- Set up shipment tracking for physical goods.
PayPal Checkout with the confirm payment source endpoint
- Create the order.
- Confirm the payment source: pass the
payment_sourcein the payload. - Payer action required: send the payer to the Review your purchase page.
- Capture order.
- Set up shipment tracking for physical goods.
PayPal Checkout with the authorize order endpoint
Create the order.- Payer action required: send the payer to the Review your purchase page.
- Authorize order.
- Capture payment.
- Set up shipment tracking for physical goods.
Other API endpoints
- Get order details.
- Update order details.
Note: After you create an order, you have 3 hours to capture or modify that order. The order will remain in the CREATED state for only 3 hours. You can extend it up to 72 hours based on your use case. Connect with your TAM for more details.
Prerequisites
If you are a first-time user who wants to know where to get your access token, how to use the API suite, and complete Postman setup details, refer to Get started with PayPal REST APIs. See PayPal’s Postman Collection for the latest Orders v2 API payloads.Note: Set up your server to call the Orders v2 API instead of making calls directly from the browser or the client-side.
Sample JSON order request 1: Single-step order flow
This example uses PayPal as the payment source for creating a multi-step order. When the buyer chooses the payment method on the Review Your Payment (RYP) page and approves the purchase, you can capture the funds or authorize them for later, depending on the intent you choose during order creation.Step 1: Create order
Set the orderintent to AUTHORIZE or CAPTURE. A successful request returns an HTTPS 200 OK status code with a payer-action-required order status. The following code samples show both the AUTHORIZE and CAPTURE intents.
Sample create order request with intent AUTHORIZE:
CAPTURE:
Include shipping details
Manage the shipping details for an order by includingshipping_preference in the experience_context for the payment method defined in the payment_source object. For example, payment_source.paypal.experience_context.shipping_preference or payment_source.venmo.experience_context.shipping_preference.
The shipping_preference parameter accepts 3 options:
- Use buyer’s PayPal shipping address (default): When you set the
shipping_preferenceparameter toGET_FROM_FILE, PayPal uses the buyer’s shipping address directly from their PayPal account. This is the default option when there is noshipping_preferencevalue. - Ask buyer to provide address: When you have the buyer’s address while creating the order and want to pass it as part of the request, add the
shipping_preferencefield topayment_source.paypal.experience_contextand set its value toSET_FROM_PROVIDER. You need to pass that address in thepurchase_unitssection of the request. The following Sample shipping request payload shows how to include the shipping address. An important note: buyers cannot edit this address on the PayPal side. - No shipping: For digital goods or gift cards that have no physical delivery address, set the
shipping_preferenceparameter toNO_SHIPPING.
Sample shipping request
This sample request passes the shipping details using the thepurchase_units.shipping object.
Step 2: Buyer approval
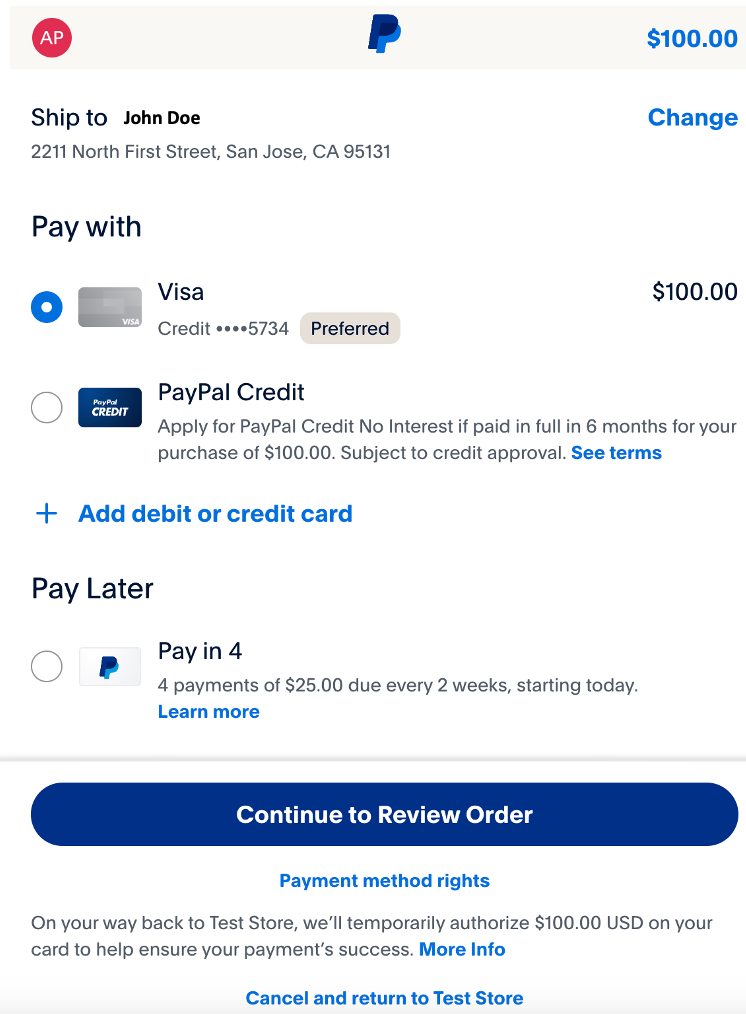
After successfully creating the order, redirect the buyer to the RYP page. The Create order API response passes the RYP page URL as a HATEOS link using thepayer-action parameter in the links section.
See example buyer approval page
See example buyer approval page

return_url in the experience_context object. Replace it with the URL of the page where the buyer:
- Sees the final order amount.
- Reviews their final order.
PAY_NOW flow to complete the payment in one go without requiring further action from the buyer on the merchant site.
Set this option in paypal.experience_context.user_action:
CONTINUEis the default value foruser_action.- Choose
PAY_NOWif you know the final amount before the buyer reaches the first review page.
Step 3: Authorize or capture order
Both authorize and capture API requests acceptpayment_source as an input, but it’s optional. See the preceding create order payload for the payment source. Learn more about authorize and capture.
Capture order
After the order has been created and the payer approves the purchase, capture the order by sending aPOST request and the order ID to the /v2/checkout/orders/ORDER-ID/capture endpoint. The following sample request and response show the result of sending a capture order request without a request body:
Sample capture order request:
POST request to /v2/checkout/orders/ORDER-ID/authorize. The following sample request and response show the result of calling the authorize order endpoint without a request body:
Sample authorize order request with intent AUTHORIZE:
POST request to v2/payments/authorizations/AUTHORIZATION-ID/capture to call the Capture authorized payment endpoint of the Payments v2 API. This step triggers a call to the payment gateway to capture the payment.
Note: You can authorize the total amount or a part of the total amount. To authorize a partial payment, pass the amount in the request payload. For more information, refer to the Capture authorized payment endpoint of the Payments v2 API.The following sample request and response show the result of calling the capture API endpoint without a request body.
Note: The Payments capture is not the Order capture call.Sample capture authorized order request:
Step 4: Shipment tracking
If you have physical goods in your order, you can use the Shipment Tracking API to add tracking information to your packages, such as carrier, item, and SKU details.- If the
intentis set toCAPTURE, replaceCAPTURE-IDwith thepayments.captures.idfield that is found in the Order capture’s API response. - If the
intentis set toAUTHORIZE, replaceCAPTURE-IDwith the ID field found in the Payment capture API response, not the Order API’s capture call.
capture_id field is automatically populated if you’re using the PayPal Postman collection.
Note: See the Add tracking information for an order endpoint of the Orders v2 API for more information about each field in the payload.Sample shipment tracking request and response:
Note: See Integrate package tracking for more details about adding package tracking numbers to your orders with the Orders v2 API.
Step 5: Show the order details
You can get the details of an order at any stage by sending aGET call to the Show order details endpoint of the Orders v2 API.
Sample show order details request with an authorization token:
Sample JSON order request 2: Multi-step order flow with confirm order API endpoint
This example also demonstrates multi-step order creation using PayPal as the payment method. But unlike the preceding example, you can create an order without any payment source information. When the buyer chooses the payment method on the RYP page and approves the purchase, you can confirm their intent to pay, capture the funds, or authorize them for later, depending on the intent you choose during order creation.Step 1: Create order
Set the orderintent to CAPTURE. A successful capture order request returns an HTTPS 201 Created status code:
Sample capture order request and response:
Step 2: Confirm payment
The buyer can confirm their intent to pay for the order using a PayPal Checkout payment source: in this case, PayPal.
Note: The payment_source parameter is required.
Sample confirm payment request and response:
Step 3: Buyer approval
The buyer approves or cancels the payment in this step. For more information refer to Step 2: Buyer Approval in the preceding Sample JSON order request 2: Multi-step order flow section.Step 4: Capture payment
The last step to complete the order is to capture the payment. You can capture an order without any payment source information.Note: If you want to provide the buyer with an option to change the payment source after the approval, you can pass the new payment method details in the Capture API call. However, this would need buyer approval again as it’s a different payment source.Sample capture payment request and response:
Step 5: Shipment tracking
If you have physical goods in your order, you can use the Shipment Tracking API to add tracking information to your packages, such as carrier, item, and SKU details. For more information, refer to Step 4: Shipment tracking in the preceding Sample JSON order request 2: Multi-step order flow section.Sample JSON order request 3: Multi-step order flow with authorize API
This is similar to the previous examples which pass the intent asCAPTURE, but you need to use one of the Payments v2 API endpoints to complete the order. For more details, refer to the “Authorize” example of Step 3: Authorize or capture order in the preceding Sample JSON order request 2: Multi-step order flow section.
Step 1: Create order
Set the orderintent to AUTHORIZE. A successful capture order request returns an HTTPS 200 OK status code.
Step 2: Buyer approval
The buyer approves or cancels the payment in this step. For more information refer to Step 2: Buyer Approval in the preceding Sample JSON order request 2: Single-step order flow section.Step 3: Authorize order
An authorize order request acceptspayment_source as an optional input, like a capture order request.
Sample authorize order request with payment source:
Request
Step 4: Capture payment
Capture the authorized payment by calling the Capture authorized payment endpoint of the Payments v2 API using aPOST request to /v2/payments/authorizations/AUTHORIZATION-ID/capture. Replace AUTHORIZATION-ID with the authorization ID returned in Step 3: Authorize order. This step triggers a call to the payment gateway to capture the payment.
Note: The Payments capture is not the Order capture call, and the request body isn’t mandatory.
Step 5: Shipment tracking
If you have physical goods in your order, you can use the Shipment Tracking API to add tracking information to your packages, such as carrier, item, and SKU details. For more information, refer to Step 4: Shipment tracking in the preceding Sample JSON order request 2: Multi-step order flow.Sample JSON order request 4: Pay with Venmo
The previous workflows and samples that used PayPal as the payment method also apply to Venmo. Use the same code samples, but change thepayment_source to Venmo.
Sample create order request and response using Venmo:
